320 Final Project Week 6 5/8

Final Pic 1
Final Pic 2

Final Pic 3
Hello and welcome to the final installment in "Can Dylan successfully finish the 320 final?", the answer? YES!
After 5 weeks of painstakingly attempting to create a Blacksmith scene from scratch I have finally completed it. Now to explain my thought process on why things look and feel a certain way. My reference for the scene is one from World of Warcraft, a game I've been playing since I was a kid. The reference picture shows a blacksmith scene focused on being outdoors. There is a clear open pathway for the blacksmith to come through and work on the several different tools he has and this was the focus of my project. So from that point I sent off to make the best darn outdoor blacksmith I've ever seen or made. The criticism from last time was that there was no main thing to look at but this time around I followed my reference image and placed a large anvil on the center of the entire render just to not leave any room for curiosity. I also added more boxes and barrels in places that look like this place is interacted with quickly for transferring goods. A busy blacksmith works here.
The first step was to take the objects from Maya and make custom-made UV shells that were easy to paint on in substance and that was no easy task. Some faces flipped inside out, some UV's didn't correctly scale in the editor, and some of the objects broke a couple times so I had to start from scratch. Sad but this is the reality of the course and we are encouraged to continue so that is what I did. The experience of manually making UV shells is something we should all go through and have understanding of the importance it has on the project's look and feel. Take time on UV's because these are the base maps that the project relies upon when you continue through the step by step process.
Taking them into substance was a fun case of trial and error because this is where I learned that some UV's were completely broken and didn't paint correctly. After going back and forth in Maya and Substance, I eventually found some errors I made from the UV process and quickly patched up the holes. This was sort of a calming experience because I just put on some music and started to paint. Yes, it took up a LOT of time but in the long run I have a newfound appreciation for the art of this extensive process. Moving into the next projects, I will take my time with the painter workflow as patience is rewarded in the long run.
Taking the objects into Unity was a seamless experience for me. The objects sometimes weren't scaled correctly or there were small errors that I could hide by just not showing the camera the seams which was fun to discover. Other than that, the textures imported perfectly and there was little wiggle room for error which was a nice change of pace. Unity is where I know the most information so it was easy to manipulate and make the certain objects look like they belonged. The HDRI set up was a piece of cake and after some post processing work, the final product turned out great!
Thank you to Connor for the wonderful class and I am happily able to walk away with some newfound knowledge, Thanks!
320 Final Project Week 5 5/2
Ground Texture
Table Painter
Anvil Painter
Barrel Painter
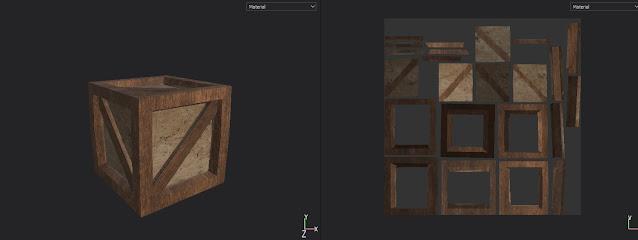
Box Painter
5 Painted Objects
Wheel Painter
For this weeks blogpost progress I finally was able to throw in the Maya renderings into Substance Painter and painter them with custom edited wood paint files. These came out pretty good and I finally was able to get the wood colors I wanted after multiple tries. Substance Designer was also a fun trip, trying to make the ground for the scene. Overall the painting and the substance designer took well over 2 days to finally finish up the process. I can't believe people actually enjoy doing this because this was so tedious and aggravating that I really never want to touch the programs again but that's part of the fun I guess. In reality, I had a better time on this than modeling and UV'ing because I get to express myself more and make the objects look how I want which is important to me.Excited for the next week!
320 Final Project Week 4 4/28
Final UV'ing
Anvil UV
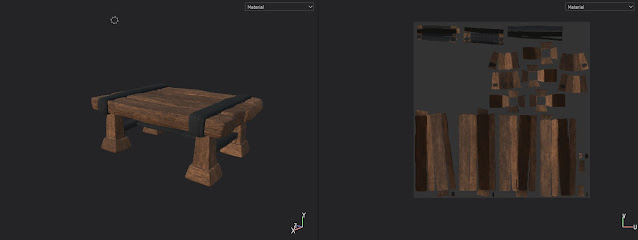
Table UV
Furnace UV
For this week's blog post for the work on my final I have completed all UV's in the scene and the next step is to finally get some texturing in. This UV'ing process took longer than expected because I had a little bit of a difficult time getting certain faces to line up properly. I do enjoy the process of substance designer/painter more because I can just listen to some music and paint, whereas UV'ing takes up tedious time but you still gotta get it done. I look forward to a slow and easy finish of the painting process.
320 Final Project Week 3 4/23
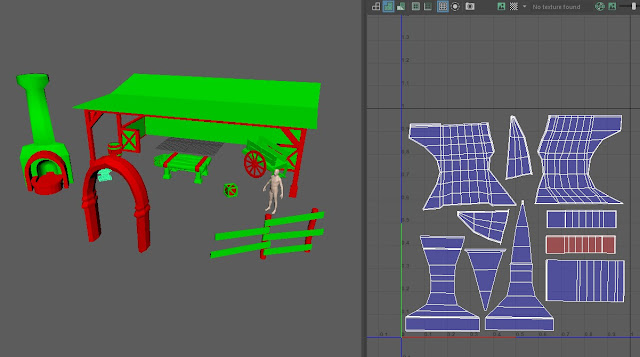
This is the 3rd week in the 320 Final Project where we must create a blacksmith scene and I finally got some UV's done. The UV's took a couple hours but I was happily distracted while I listened to music so it wasn't that bad. I have 10 objects to UV so I completed 5 to keep on pace with the project requirements. I took extra time to color coordinate the different parts of the project so it's easier for me to identify what is what in substance painter and designer. Next week I will complete my UV's and start the texturing process.
320 Final Project Week 2 4/17
For this week, we are supposed to have the list of objects we will use for our final project. This is the 10 objects I want to have a part of my final scene because I feel like it will bring the whole scene together in a small, fun theme.
These are all the objects needed for the scene to work together. There are a bunch of elements that are simple and, if placed correctly, can be very interesting in the bigger picture of the scene.
320 Final Project Week 1 4/10
For the final project in CAGD 320, we have to make a blacksmith scene and texture all the assets. For the first week, the request was to find references for the scene and block out the scene that will eventually become the scene so that is what I have provided above. The scene I chose to reference is below and it is based on a World of Warcraft blacksmith scene.
For the reference scene, I wanted to make an outside blockout for a more open feel. Something about the outside blacksmith scene feels really natural and a good start to eventually expand to more room if needed. I look forward to completing the scene as the weeks continue!
Re-topology Project
This project involved practicing retopology inside of maya, taking that file into substance, and then finally rendering the files in unity. This project took a lot of time because we had to completely remake the topology of the original knife models. This means that we had to essentially remake the knife from scratch regarding its poly count. We had to take a high poly model and remake a low poly skeleton around it. This low poly model was taken into substance painter where we baked the high poly model onto the low poly model. This makes the low poly LOOK like the high poly. Inside substance painter, we then re-painted the entire model to match its original look. This involved painting over the UV's we had to create in Maya. From substance painter, we took the models and the new paint jobs into Unity. In Unity, we have to create a new material that has the file locations for the new paintings. For that, we plug in each file we exported from Substance and... finally! The above pictures are the final renders in the Unity HDRI pipeline and I think they ended up pretty nicely. In the process, I came across a slight hurdle when I noticed one of my UV's was not stitched together properly so that took some time to fix but other than that this was a successful project and I learned a lot!
Substance Painters
This project was focused heavily on substance painter rather than designer or alchemist. This project used 2 tutorials given to us by Substance itself in an effort to teach baseline information about how the application works. Personally, this project was really enjoyable for me because of the amount of similarities between painter and photoshop. Photoshop is a really useful tool to get any texture done that you would want to create and the same can be said about painter. Within the application I was sometimes confused but I was able to work through it and come out on top. I now can say I understand the ins and outs of substance painter in relation to Maya FBX files. In the projects themselves, we were able to create specific paints for specific maps or ID's. This means that once you create a texture that is to your liking, you can save it as a "smart texture" then apply it to each individual section of the model itself. For example, on the lantern, there is one texture that I finished for the bottom of the model. Once I saved it, I was then able to connect it to the entire rest of the model, having the texture perfectly wrap around the parts that I wanted it to automatically. I did notice some major differences between designer and painter that stood out. Designer is heavier on "nodes" or premade textures that you can physically manipulate at will to get the desired texture you want. This is different than painter because painter allows you to manually get close to the model and paint in specific places you want there to be extra detail.
Substance Alchemist


These beginning assignments were to teach us the ropes of substance designer and teach us just exactly what it takes to be proficient at it. The above pictures are all made by me using the substance designer application. Substance Designer was interesting to use because I have never encountered an application that uses "nodes" quite like this one. Nodes are used to connect multiple different other nodes together to eventually create any material you would ever think of making. These multiple tutorials were crucial to my understanding of how to use the application because of how in-depth the narrator went into every single option and the effects of changing the slightest thing. As the tutorials went on, the difficulty and tediousness went up, this means that there are unlimited ways of utilizing substance to your liking and I have barely skimmed the surface with how far you can really go in the substance rabbit hole.
Starting off, I didn't really understand that nodes can really do anything and connect anywhere until I grabbed a hold of the wires that it uses to connect from node to node. This logical way of connecting things physically resulted in my understanding of the PBR workflow going through the roof instantly. When I began to connect the nodes, my brain itself was making connections based on the logical steps it takes to eventually create that output node that has everything on it that you want. Working through my frustrations on the several projects allowed me to gain an even deeper understanding of the texturing process and I will always carry with me that respect when I collaborate with modelers in the future. When I get the chance to have someone really talented at designer on my team, I'll make sure to use specific language with them that I have learned over this process to communicate in better ways.
https://www.youtube.com/watch?v=ji45Nmc93Nk&feature=emb_title Brick Tutorial
https://www.youtube.com/watch?v=NzKtubDsC9o&feature=emb_title Metal Tutorial
https://www.youtube.com/watch?v=98rn8MGIZjA&feature=emb_title Wood Plank Tutorial
https://www.youtube.com/watch?v=i_q_JaCg7hk&list=PLB0wXHrWAmCwWfVVurGIQO_tMVWCFhnqE&index=2&t=0s Mud and Twigs Tutorial


Comments
Post a Comment